Learning how to rig a bobber is one of the friendliest ways to make freshwater fishing feel clear instead of confusing. A bobber gives your eyes something easy to watch, keeps your bait near the depth you choose, and helps you notice light bites that might otherwise go missed.
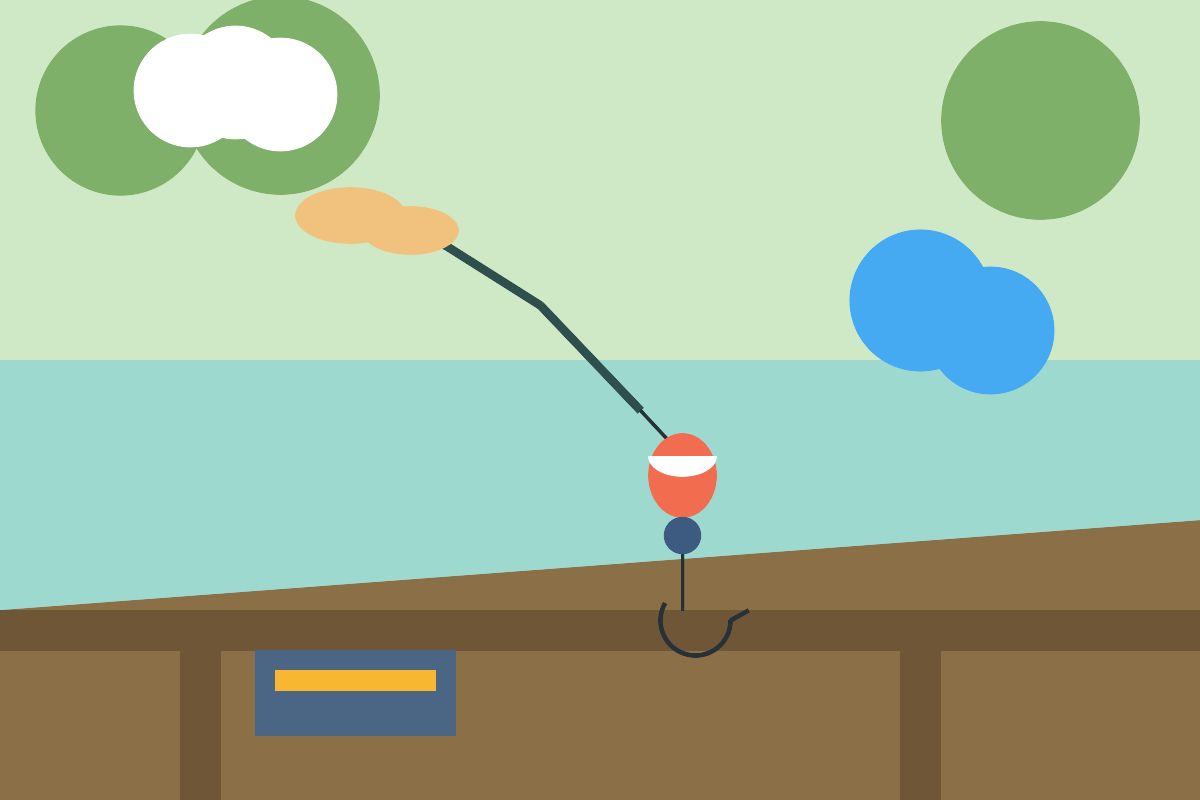
The basic idea is simple: bobber above, hook below, and a small split shot weight between them when needed. Once you understand that order, you can adjust depth, bait, and weight without rebuilding your whole setup every time.
If you already enjoy simple float fishing, this guide builds naturally on our bobber fishing basics. Here we will slow down and focus on the rig itself: where each piece goes, why it matters, and how to make small adjustments at the pond, dock, or lake bank.
Why Bobber Rigging Matters for Beginners
A bobber rig works because it solves two beginner problems at once. First, it keeps bait suspended instead of letting it sink straight into weeds, mud, or rocks. Second, it gives you a clear visual signal when something is nibbling below the surface.
That does not mean the bobber catches the fish for you. The rig still needs the right depth, a hook that matches the bait, and just enough split shot to help the bait settle naturally. When those three pieces work together, fishing feels calmer.
What You Need for a Basic Bobber Rig
For a fixed bobber rig, gather a small bobber, a hook, one or two small split shot weights, and bait such as a worm, cricket, or small piece of nightcrawler. You do not need fancy gear for bluegill, sunfish, perch, or small bass.
The nonprofit Take Me Fishing explains that beginner anglers can use a basic bobber rig for still fishing and place small split shot on the line to help keep bait suspended vertically. Their fishing rigs guide is a useful outside reference if you want to compare common rig styles before your next trip.
Choose the right bobber size
Use the smallest bobber that still floats your bait and weight. A giant bobber can resist light bites and make small fish harder to detect. A bobber that is too tiny may sink from the weight of your bait.
Choose a beginner-friendly hook
For panfish, many beginners do well with small hooks that match the bait. The hook should be large enough to hold the bait but not so large that small fish cannot take it cleanly. If you are unsure, start modest and adjust after you see what fish are biting.
How to Rig a Bobber Step by Step
Set the rod down safely, keep the hook point away from your hands, and build the rig in this order. Slow rigging saves more time than rushing into tangles.
Step 1: Tie on the hook
Tie your hook to the end of the line with a knot you trust. If you need a simple option, our improved clinch knot walkthrough shows a dependable beginner knot for hooks and small tackle.
Step 2: Clip the bobber above the hook
Attach the bobber above the hook. For a first try, place it about two to three feet above the hook if you are fishing a shallow pond edge, dock, or bank spot. That gives your bait room to hang without making the rig awkward to cast.
Step 3: Add split shot below the bobber
Pinch one small split shot on the line between the bobber and hook. A good starting point is several inches above the hook, close enough to help the bait sink but not so close that it looks stiff and unnatural.
Step 4: Bait the hook neatly
Thread on a small piece of worm or other bait so the hook point stays exposed enough to catch. Too much bait can hide the hook completely, while too little bait may fall off on the cast.
Step 5: Test the rig at your feet
Drop the rig in shallow water near you before casting far. The bobber should float upright or close to upright, and the bait should sink below it instead of spinning wildly near the surface.
Setting Bobber Depth Without Overthinking It
Depth is the distance between your bobber and hook. If your bobber is two feet above the hook, your bait is roughly two feet below the surface. That is the part beginners can control, and it is often the easiest adjustment to make.
Start with the bait suspended above weeds or bottom debris. If the bobber never moves, slide it deeper by six inches to a foot. If you keep snagging grass, mud, or sticks, move the bobber closer to the hook so the bait rides higher.
- Shallow pond edge: Try 18 inches to 3 feet as a gentle starting range.
- Dock with visible bluegill: Start just above the fish you can see, then adjust slowly.
- Deeper bank water: Go deeper in small steps instead of guessing the full depth at once.
- Weedy water: Keep bait above the weeds, not buried in them.
Where Split Shot Should Go
Split shot adds casting weight and helps your bait settle. Use just enough to make the rig behave. If you clamp on too much weight, the bobber may sink or the bait may drop like a rock.
A simple starting setup is one small split shot several inches above the hook. If your bait drifts too high or the bobber lies sideways, add a little weight or move the weight slightly. If the bobber sinks, remove weight or use a larger bobber.
When you want to understand how a weight-focused rig works without a bobber, our bottom fishing guide explains the slower bait-on-bottom approach. It is a different presentation, but comparing the two helps you see why bobber rigs are so useful for suspended bait.
Common Bobber Rig Mistakes to Avoid
The most common mistake is setting the bobber too deep for the water. If the hook drags bottom constantly, you will snag more and learn less. Shorten the distance between bobber and hook until the rig floats cleanly.
The second mistake is using too much bait. A huge worm ball may look generous, but it can make little panfish peck without getting hooked. Smaller, neater bait often works better for beginners.
The third mistake is treating every bobber movement like a hookset. Some bobber wiggles are wind, waves, or tiny fish pecking. Wait for a steady pull, a sideways slide, or the bobber going under before lifting the rod smoothly.
Before keeping any fish, check your local license and harvest rules. The U.S. Fish and Wildlife Service points anglers toward state agencies through its fishing information hub, which is a sensible starting point when rules vary by location.
Pros and Cons of a Basic Bobber Rig
Easy bite signal
The bobber gives beginners a visible cue instead of relying only on feel through the rod.
Good depth control
You can move the bobber up or down to keep bait above weeds, rocks, or shallow bottom.
Family-friendly setup
It is simple enough for relaxed fishing with kids, grandkids, or a first-time fishing partner.
Can be awkward in deep water
A fixed bobber gets harder to cast when the distance to the hook becomes very long.
Wind can move it around
Strong wind may push the bobber faster than your bait naturally wants to drift.
A Simple Bobber Rig Checklist
Before each cast, run through this quick check. It keeps the rig tidy and helps you notice small problems before they become big tangles.
- Hook tied cleanly: The knot is snug, trimmed, and not slipping.
- Bobber depth set: The bait should hang above weeds or bottom snags.
- Split shot balanced: The bobber floats, and the bait sinks gently.
- Bait secure: The hook point is not buried under too much bait.
- Casting path clear: No people, branches, or loose tackle are behind you.
Frequently Asked Questions
How far should the bobber be from the hook?
Start around two to three feet for shallow bank or pond fishing, then adjust deeper or shallower based on weeds, bottom contact, and bites.
Do I always need split shot with a bobber?
Not always, but one small split shot often helps the bait sink and keeps the bobber standing better. Use the least weight that works.
Why does my bobber lie sideways?
It may need a little more weight, the bait may not be sinking, or the water may be shallower than your depth setting. Test close to shore and adjust slowly.
When should I set the hook?
Lift the rod when the bobber goes under, slides steadily sideways, or keeps dipping with purpose. Do not jerk hard at every tiny wiggle.
Final Thoughts
Once you know how to rig a bobber, freshwater fishing becomes much easier to read. Tie the hook, set the bobber depth, add a small split shot, bait neatly, and test the rig before making a long cast.
Keep your first setup simple. A calm bobber, a small hook, and a tidy piece of bait can teach you more in one relaxed hour than a crowded tackle box full of choices.